Wovnプッシュ通知翻訳機能(自動翻訳)
注意: このドキュメントは主に Firebase Cloud Messaging を対象としています。Fanship などの別のサービスを使用している場合は、以下の関連セクションを参照するか、お問い合わせください。
このドキュメントでは、アプリケーションが既にプッシュ通知用に Firebase Cloud Messaging サービスに接続されていること��を前提としています。まだ接続していない場合は、公式の Google ドキュメント に従ってください。
概要
このドキュメントでは、以下のことを学びます:
- WOVN が通知をどのように翻訳できるか
- エンドユーザーに表示する前にサーバーからの通知データにアクセスし、翻訳するために WOVN を許可する方法
- 敏感なユーザー情報を含む通知データを翻訳するために WOVN を使用する方法
- ローカルプッシュ通知を翻訳するために WOVN を使用する方法
- プッシュ通知に Fanship と WOVN を統合する方法
詳細
1. WOVN が通知をどのように翻訳できるか
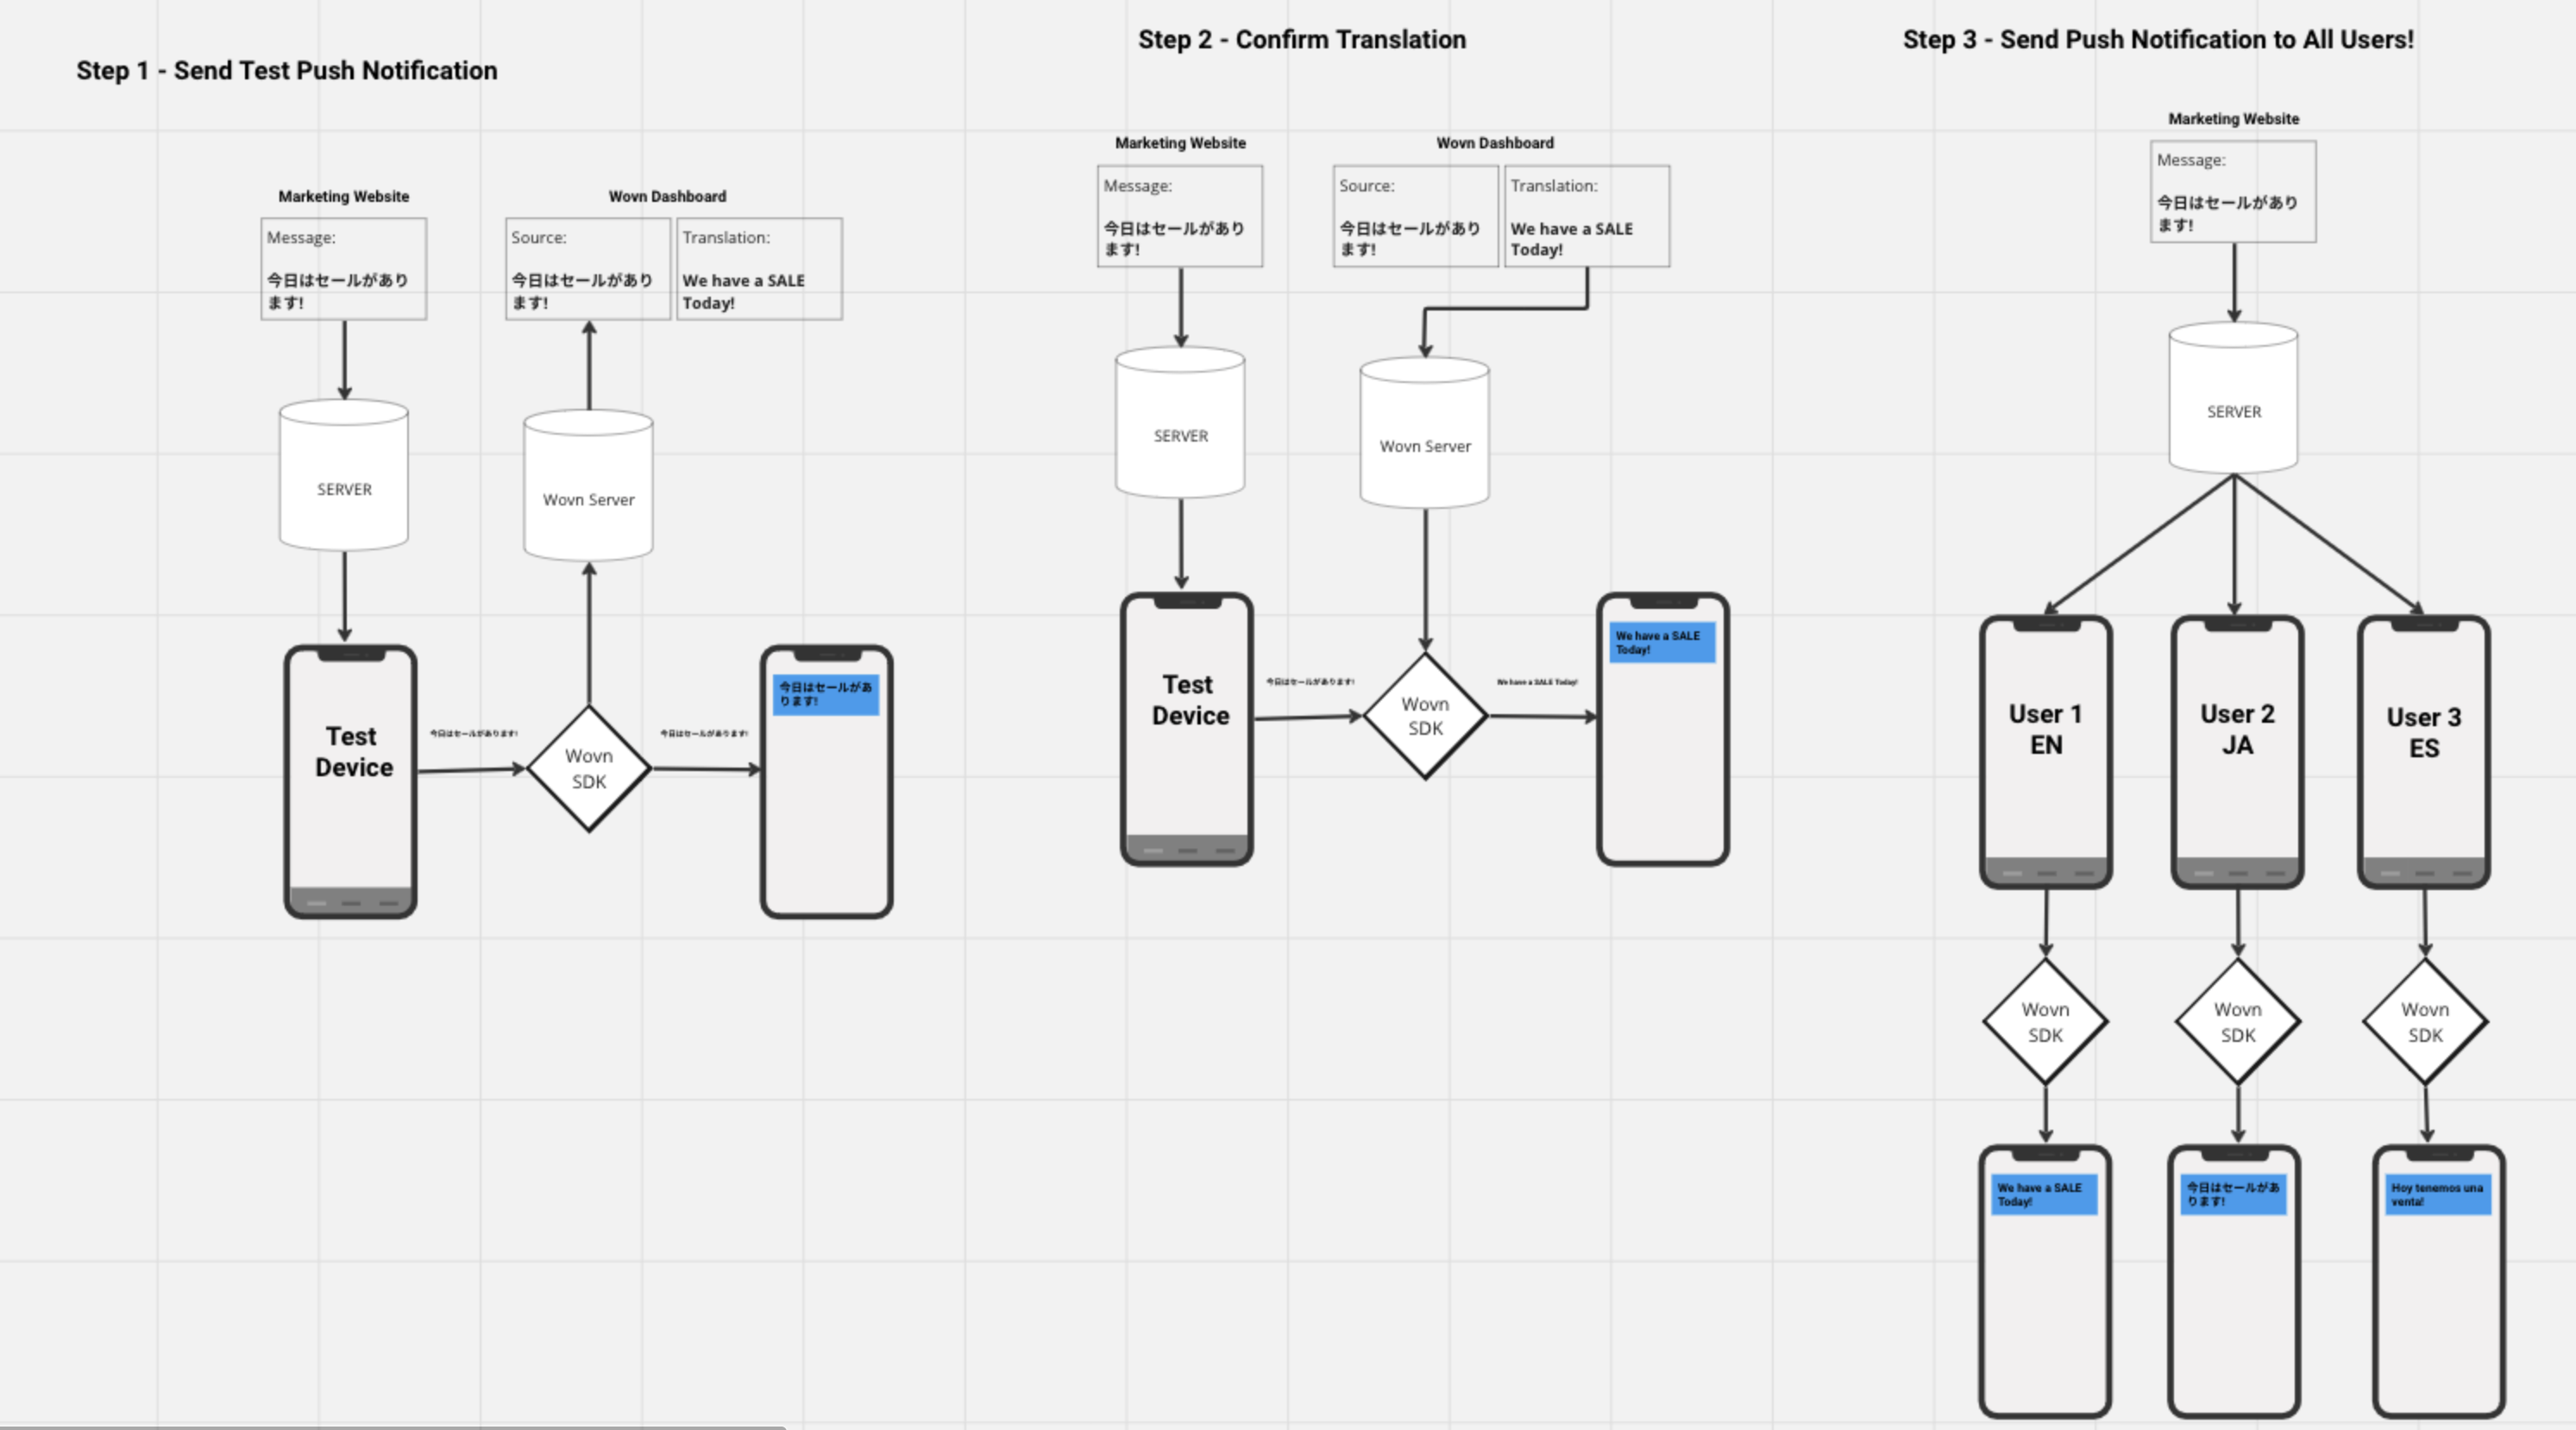
- まず、テストデバイスにテストプッシュ通知を送信します。これにより、WOVN は通知データを WOVN ダッシュボードに�報告し、翻訳できるようになります。
- WOVN ダッシュボードが通知データを翻訳した後、同じ通知を再度テストデバイスに送信して確認します。
- 通知が翻訳されたことを確認したら、すべてのユーザーに通知を送信できます。
2. エンドユーザーに表示する前にサーバーからの通知データにアクセスし、翻訳するために WOVN を許可する方法
-
FirebaseMessagingServiceを拡張してカスタムロジックを追加していない場合は、このドキュメント に従って拡張してください。 -
FirebaseMessagingServiceを拡張したクラス内に以下のコードを追加します。WOVN およびその他の必要な依存関係をインポートすることを忘れないでください。@Override
public void handleIntent(Intent intentSrc) {
Intent intentDst = Wovn.translateFirebaseNotificationIntent(intentSrc);
final String title = intentDst.getStringExtra("title") == null
? intentDst.getStringExtra("gcm.notification.title")
: intentDst.getStringExtra("title");
final String body = intentDst.getStringExtra("body") == null
? intentDst.getStringExtra("gcm.notification.body")
: intentDst.getStringExtra("body");
showNotification(title, body);
}
public void showNotification(String title, String message) {
if( title != null || message != null ) {
Context context = getApplicationContext();
showNotification(context, title, message);
}
}
public static void showNotification(Context context, String title, String message) {
final String CHANNEL_ID = "MyChannelId";
final int NOTIFICATION_ID = 1;
NotificationManager notificationManager = (NotificationManager) context.getSystemService(Context.NOTIFICATION_SERVICE);
// Android Oreo 以降用の通知チャンネルを作成
if (Build.VERSION.SDK_INT >= Build.VERSION_CODES.O) {
NotificationChannel channel = new NotificationChannel(CHANNEL_ID, "Channel Name", NotificationManager.IMPORTANCE_DEFAULT);
notificationManager.createNotificationChannel(channel);
}
// 通知を作成
NotificationCompat.Builder builder = new NotificationCompat.Builder(context, CHANNEL_ID)
.setSmallIcon(R.drawable.arrow_point_to_right)
.setContentTitle(title)
.setContentText(message)
.setAutoCancel(true);
// 通知を表示
notificationManager.notify(NOTIFICATION_ID, builder.build());
// WOVN 用
lastNotiTitle = title;
lastNotiBody = message;
} -
ステップ2の後、ファイルは以下のようになります:
package io.wovn.app.demo.activities;
import android.app.NotificationChannel;
import android.app.NotificationManager;
import android.content.Context;
import android.content.Intent;
import android.os.Build;
import androidx.annotation.NonNull;
import androidx.core.app.NotificationCompat;
import com.google.firebase.messaging.FirebaseMessagingService;
import com.google.firebase.messaging.RemoteMessage;
import io.wovn.app.demo.R;
import io.wovn.wovnapp.Wovn;
public class WovnFirebaseMessagingService extends FirebaseMessagingService {
public static String lastNotiTitle = "";
public static String lastNotiBody = "";
@Override
public void onMessageReceived(@NonNull RemoteMessage remoteMessage) {
// この関数は handleIntent をオーバーライドしているため呼び出されません
}
@Override
public void handleIntent(Intent intentSrc) {
    Intent intentDst = Wovn.translateFirebaseNotificationIntent(intentSrc);
    final String title = intentDst.getStringExtra("title") == null
            ? intentDst.getStringExtra("gcm.notification.title")
            : intentDst.getStringExtra("title");
    final String body = intentDst.getStringExtra("body") == null
            ? intentDst.getStringExtra("gcm.notification.body")
            : intentDst.getStringExtra("body");
    showNotification(title, body);
}

public void showNotification(String title, String message) {
    if( title != null || message != null ) {
        Context context = getApplicationContext();
        showNotification(context, title, message);
    }
}

public static void showNotification(Context context, String title, String message) {
    final String CHANNEL_ID = "MyChannelId";
    final int NOTIFICATION_ID = 1;
    NotificationManager notificationManager = (NotificationManager) context.getSystemService(Context.NOTIFICATION_SERVICE);

    // Android Oreo 以降用の通知チャンネルを作成
    if (Build.VERSION.SDK_INT >= Build.VERSION_CODES.O) {
        NotificationChannel channel = new NotificationChannel(CHANNEL_ID, "Channel Name", NotificationManager.IMPORTANCE_DEFAULT);
        notificationManager.createNotificationChannel(channel);
    }

    // 通知を作成
    NotificationCompat.Builder builder = new NotificationCompat.Builder(context, CHANNEL_ID)
            .setSmallIcon(R.drawable.arrow_point_to_right)
            .setContentTitle(title)
            .setContentText(message)
            .setAutoCancel(true);

    // 通知を表示
    notificationManager.notify(NOTIFICATION_ID, builder.build());
    // WOVN 用
    lastNotiTitle = title;
    lastNotiBody = message;
}
@Override
public void onDeletedMessages() { /* 何もしない */ }
@Override
public void onNewToken(@NonNull String token) { /* 何もしない */ }
} -
CHANNEL_IDやNotification iconなどの小さな詳細を修正すると、WOVN はすべての通知を翻訳します。
機能のテスト
-
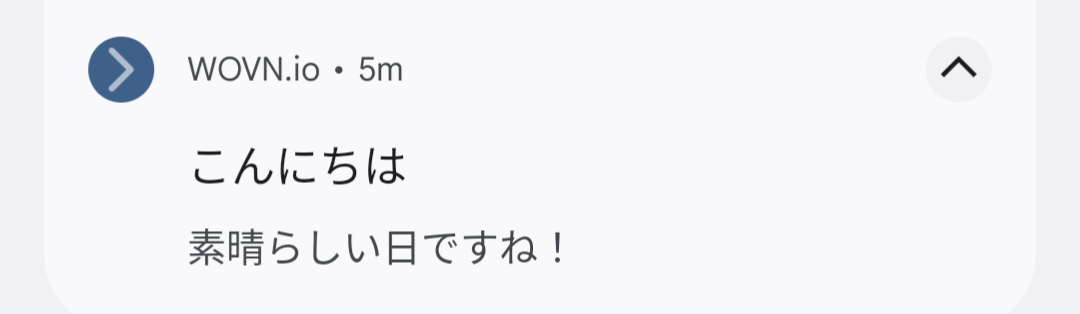
以下のデータを使用して、Firebase Cloud Messaging 経由でデバイスにプッシュ通知を送信できます。
{
"to": "{YOUR TESTING DEVICE FCM TOKEN}",
"notification": {
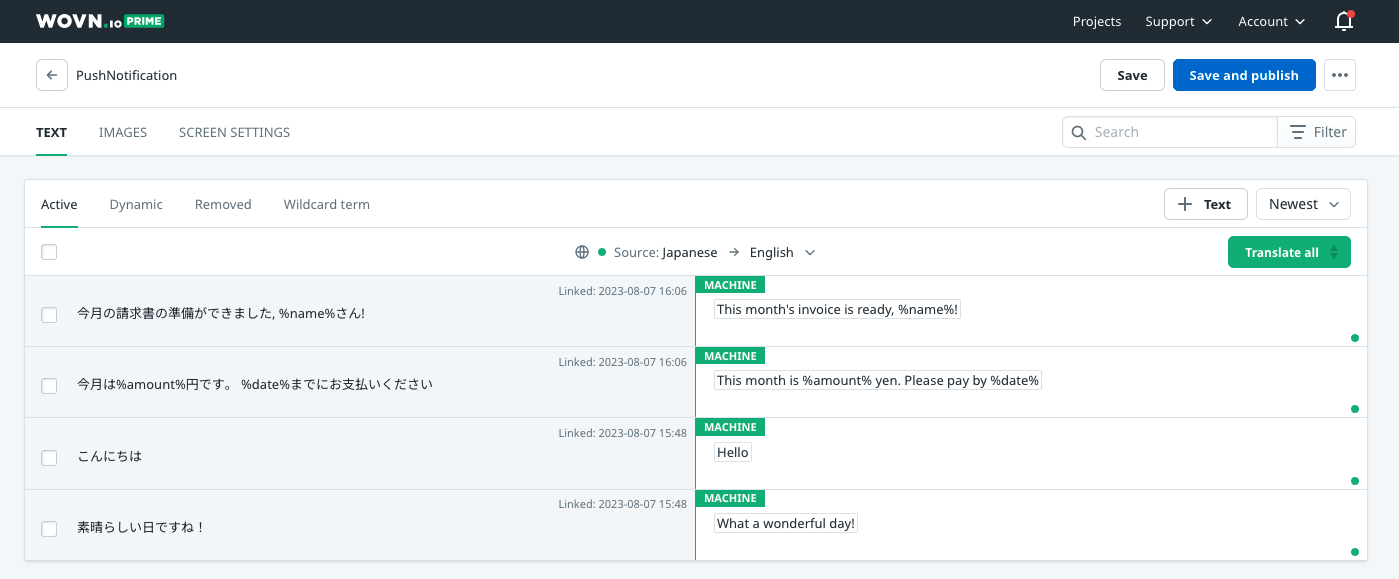
"title": "こんにちは",
"body": "素晴らしい日ですね!"
}
} -
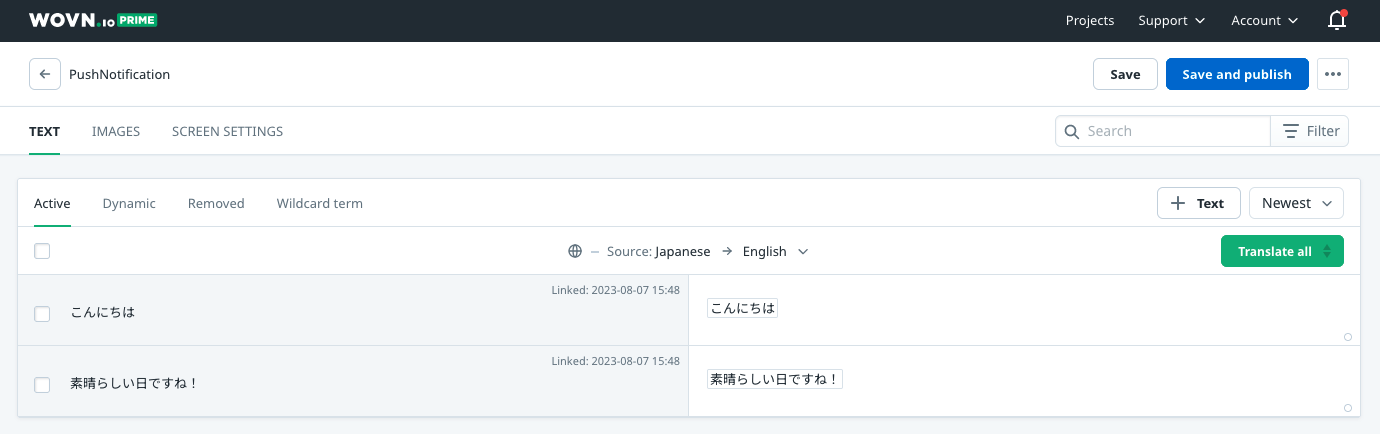
初回は、テストデバイスが日本語の通知を受け取るはずです。これは WOVN がまだその翻訳を持っていないためです。WOVN にデータの報告を許可している場合、通知のタイトルと本文は WOVN ダッシュボードの PushNotification 画面内で確認できます。
-
2つの値を翻訳した後、
Save and publishをクリックすると、次回同じ通知を送信した際にエンドユーザーの言語に翻訳されるはずです。
3. 敏感なユーザー情報を含む通知データを翻訳するために WOVN を使用する方法
-
通知の
titleやbodyに直接ユーザーデータを追加する代わりに、%{variable_name}%を使用し、データを通知のdata内に含めることができます。{
"to": "{YOUR TESTING DEVICE FCM TOKEN}",
"notification": {
"title": "今月の請求書の準備ができました, %name%さん!",
"body": "今月は%amount%円です。 %date%までにお支払いください"
},
"data": {
"name": "John Doe",
"amount": "10000",
"date": "2023/12/12"
}
} -
通常のプッシュ通知をテストする際と同じプロセスに従い、ユーザーの機密データを含む通知も情報漏洩せずに翻訳できます。

4. ローカルプッシュ通知を翻訳するために WOVN を使用する方法
Wovn.translateNotificationData を使用して、ローカルプッシュ通知データを表示前に翻訳できます。
Map<String, Object> data = new HashMap<>();
data.put("name", "John Doe");
data.put("amount", 2468);
data.put("duration", 31);
String title = Wovn.translateNotificationData("こんにちは%name%さん。%amount%円の請求書があります", data);
String body = Wovn.translateNotificationData("%amount%円を%duration%日以内にお支払いください", data);
// ローカルプッシュ通知を表示するコード
5. プッシュ通知にFanshipとWOVNを統合する方法
Firebase Cloud Messagingの代わりにFanship をプッシュ通知サービスとして使用している場合は、翻訳データを傍受するためのステップを実装する必要があります。以下はWOVNとFanshipを統合する方法の例です:
class MyFirebaseMessagingService : FirebaseMessagingService() {
    override fun onNewToken(newToken: String) {
        super.onNewToken(newToken)
        Log.d("MyFirebaseMessagingService", "FCM onNewToken: $newToken")
        // FCMトークンの登録
        Popinfo.setToken(this, newToken)
    }

    override fun onMessageReceived(remoteMessage: RemoteMessage) {
        super.onMessageReceived(remoteMessage)
        // Fanshipで処理する前にWovnでメッセージデータを翻訳
        Wovn.translateFanshipRemoteMessageData(remoteMessage.data)
        // FANSHIP FCMメッセージ設定
        Popinfo.fcmMessageHandler(this, remoteMessage)
    }
}
実装にはWOVNとFanshipの両方に必要なインポートをすべて含めるようにしてください。重要なポイントは、Fanship のメッセージハンドラーに渡す前に、リモートメッセージデータを Wovn.translateFanshipRemoteMessageData() で呼び出すことです。